MMIX Hello World - VMB Example

Content
MMIX Hello World - Using the Virtual Motherboard
We continue here the basic Hello World Example using a instruction level simulator that is intended to adhere to the complete specification given in Donald Knuth's MMIXware and be in its use as much as possible compatible to Donald Knuth's implementation. The Virtual Motherboard (VMB) implementation adds however the ability to program your own operating system and connect arbitrary devices to the MMIX CPU using a virtual bus system.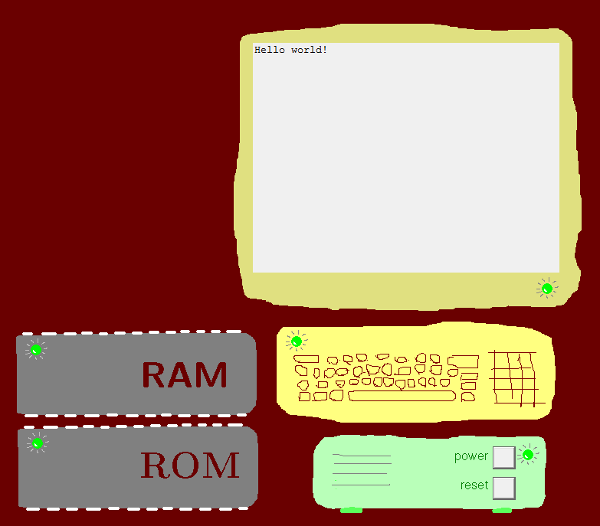
We start with the same hello.mms file which we discussed in depth in the previous example:
     LOC  Data_Segment
     GREG @
Text BYTE "Hello world!",10,0

     LOC #100

Main LDA $255,Text
     TRAP 0,Fputs,StdOut
     TRAP 0,Halt,0
As before, we use the standard MMIX Assembler mmixal (Win32, Linux, OS X) like this:
mmixal hello.mm
to produce file hello.mmo which is an MMIX object file. To execute it, we use this time the VMB based simulator, which consists of several independent device simulators that work together to simulate a complete computer.
You can download the components individually, but for users of Windows, the recommended approach is to download the latest setup.exe file from the VMB Homepage which contains all the necessary device simulators. Then you can skip the next paragraph except for downloading a ROM Image bios.img.
For the Hello World example, we need the following components: The motherboard (Win32, Linux), RAM (Win32, Linux) to hold the application program, ROM (Win32, Linux) and a ROM Image bios.img to contain the BIOS implementing the operating system, and a screen (Win32, Linux) to display output. Since our example does not use Input, a keyboard (Win32, Linux) is not strictly necessary, we add it, however, to make the system complete and who knows, may be you want to experiment with the system and use input. Finally, we need a version of the MMIX CPU (Win32, Linux) that knows how to work with the Virtual Motherboard.
The complete system is started by the motherboard (using a common configuration file default.vmb). So double click on the mother board (Win32), or type mother in a terminal window (Linux), and you will find the system starting. While again the MMIX CPU is started in interactive mode (open default.vmb with a text editor and you find the command exec mmixcpu -i hello.mmo starting the CPU, which except for the change from mmix to mmixcpu should look familiar), you will not yet see the mmix> input prompt. The system is waiting for you to press the virtual power button. Do so pressing the button labeled "Power" on the motherboard window (Win32) or type the command "on" in the terminal window (Linux) and voila! the MMIX CPU comes alive and you get the mmix> input prompt.
From there on you can step trough the program as before, getting the same output as with the original simulator. The only difference you will observe: the output string "Hello world!" will not appear in the CPU window, but on the screen simulator instead (that's were output belongs, except for debugging output, which is still in the CPU window).
Lets look at some of the debug output:
Power...ON
mmix>
0000000000000100: 23fffe00 (ADDUI) $255=g[255] = 2305843009213693952 = #2000000000000000
  26 instructions, 23 mems, 32 oops; 0 good guesses, 0 bad
  (now at location #0000000000000104)
mmix>
0000000000000104: 00000701 (TRAP) $255 = Fputs(StdOut,#2000000000000000) -> #8000000000000230
  27 instructions, 23 mems, 37 oops; 0 good guesses, 0 bad
  (now at location #8000000000000230)
 ...............................................
mmix>
8000000000000328: fd000005 (SWYM)
Program halted!
  303 instructions, 91 mems, 395 oops; 32 good guesses, 17 bad
Note the instruction counts for the operations. When the Main program starts, the CPU has already executed 26 instructions in 32 cycles (oops) using 23 read/write operations (mems). These are the instructions the operating system needed to boot the system using the BIOS code in ROM. Similarly, after tracing the TRAP 0,Fputs,StdOut you see the line of dots indicating further instructions not shown and when the program comes to a halt, it has executed 303 instructions in 395 cycles. You might guess that these instructions are implementing the Fputs operating system call.
Of course it is possible to trace the CPU inside the operating system. It is just switched off by default to make mmixcpu ,the VMB implementation of mmix, as close as possible to the MMIXware version of mmix. So lets run the program again to see the BIOS in action.
Tracing inside the Operating System
You can restart the MMIX CPU by either restarting the whole program, or simply by pressing the reset button (Win32) or typing the command "reset" (Linux) in the motherboard window.
At the mmix prompt enter the command -O, (which can also be used on the command line) to enable tracing inside the operating system. Now you can see instruction for instruction how the CPU boots, jumps to our Main program, jumps back into the operating system sending character by character the "Hello world!" to the screen, and finally ending in an idle loop when your program halts.
Where do all these instructions that make up the operating system come from? They reside in the ROM! And how do they get into ROM? The ROM device reads the image file bios.img (as instructed to do so in the default.vmb configuration file).
And how do the instructions get into the image file? That's what we look at next.
Creating a BIOS ROM Image
When the MMIX CPU boots up (after receiving power or after a reset) it starts to execute instruction beginning at virtual address #8000 0000 0000 0000. So writing a program for the BIOS starts with the appropriate LOC instruction. A very simple BIOS implementation contained in the file bios.mms is used in this example. This is a regular MMIX assembly code file and you edit this file with a text editor, and convert it to an MMIX object file bios.mmo using the (by now familiar) command
mmixal bios.mms
There is one extra step, to convert an MMIX object file to an image file. This step is performed by the program mmoimg (Win32, Linux) which actually is a modified version of mmotype. This program produces the bios.img file from the bios.mmo file.
So now you can start modifying the operating system and making your own system calls. There are some examples available that demonstrate what you can do in this way.
- The Lorentz Attractor example,
which uses code from Andrew Pochinsky's
MMIXX implementation
to show a colorful rendering of a Lorentz attractor on the VMB graphics display.
It uses a single (new) TRAP, implemented in the corresponding BIOS
to put one pixel on the display.
- Another simple example it the Stopwatch example.
It implements a simple stopwatch using three buttons, a timer, and a
seven-segment display, that runs entirely in ROM (no RAM, no
Application) like embedded systems do.
- The Minesweeper example,
(re)implementing the well known Windows game in MMIX
uses the VMB graphics display for output and the mouse for input.
For serious development of an operating system, you would need, however, a higher level systems programming language like C, C++, Ada, ... to produce code for the MMIX. We look at how this works in the next Hello World example introducing the the GNU tools.